MASTERING THE ART OF TYING A TIE
Do you want to master the art of tying a tie but don’t know where to start? We get it. A well-tied tie can be the cornerstone of a great outfit. And while it might seem like a small detail, mastering a few key knots can really elevate your look and see you through key life events like work, interviews and your best friends wedding.
Ever wondered where this whole tie-tying business even came from? Well, the history of neckwear is pretty interesting. While the modern necktie evolved from the cravat – a piece of linen worn by Croatian mercenaries in the 17th century – the idea of tying fabric around the neck for style and status goes way back. Over time, these neck coverings became more formal, eventually morphing into the ties we know today. The purpose? Initially, it was partly functional, keeping collars closed, but it quickly became a symbol of sophistication and personal expression. Different knots emerged, offering variations in size, shape, and formality.
Alright, let’s get down to it. Here are three classic tie knots that every man should know:
THE FOUR-IN-HAND KNOT
This is your go-to, the reliable friend of tie knots. It’s slightly asymmetrical and versatile, perfect for everyday wear.
HOW TO TIE IT
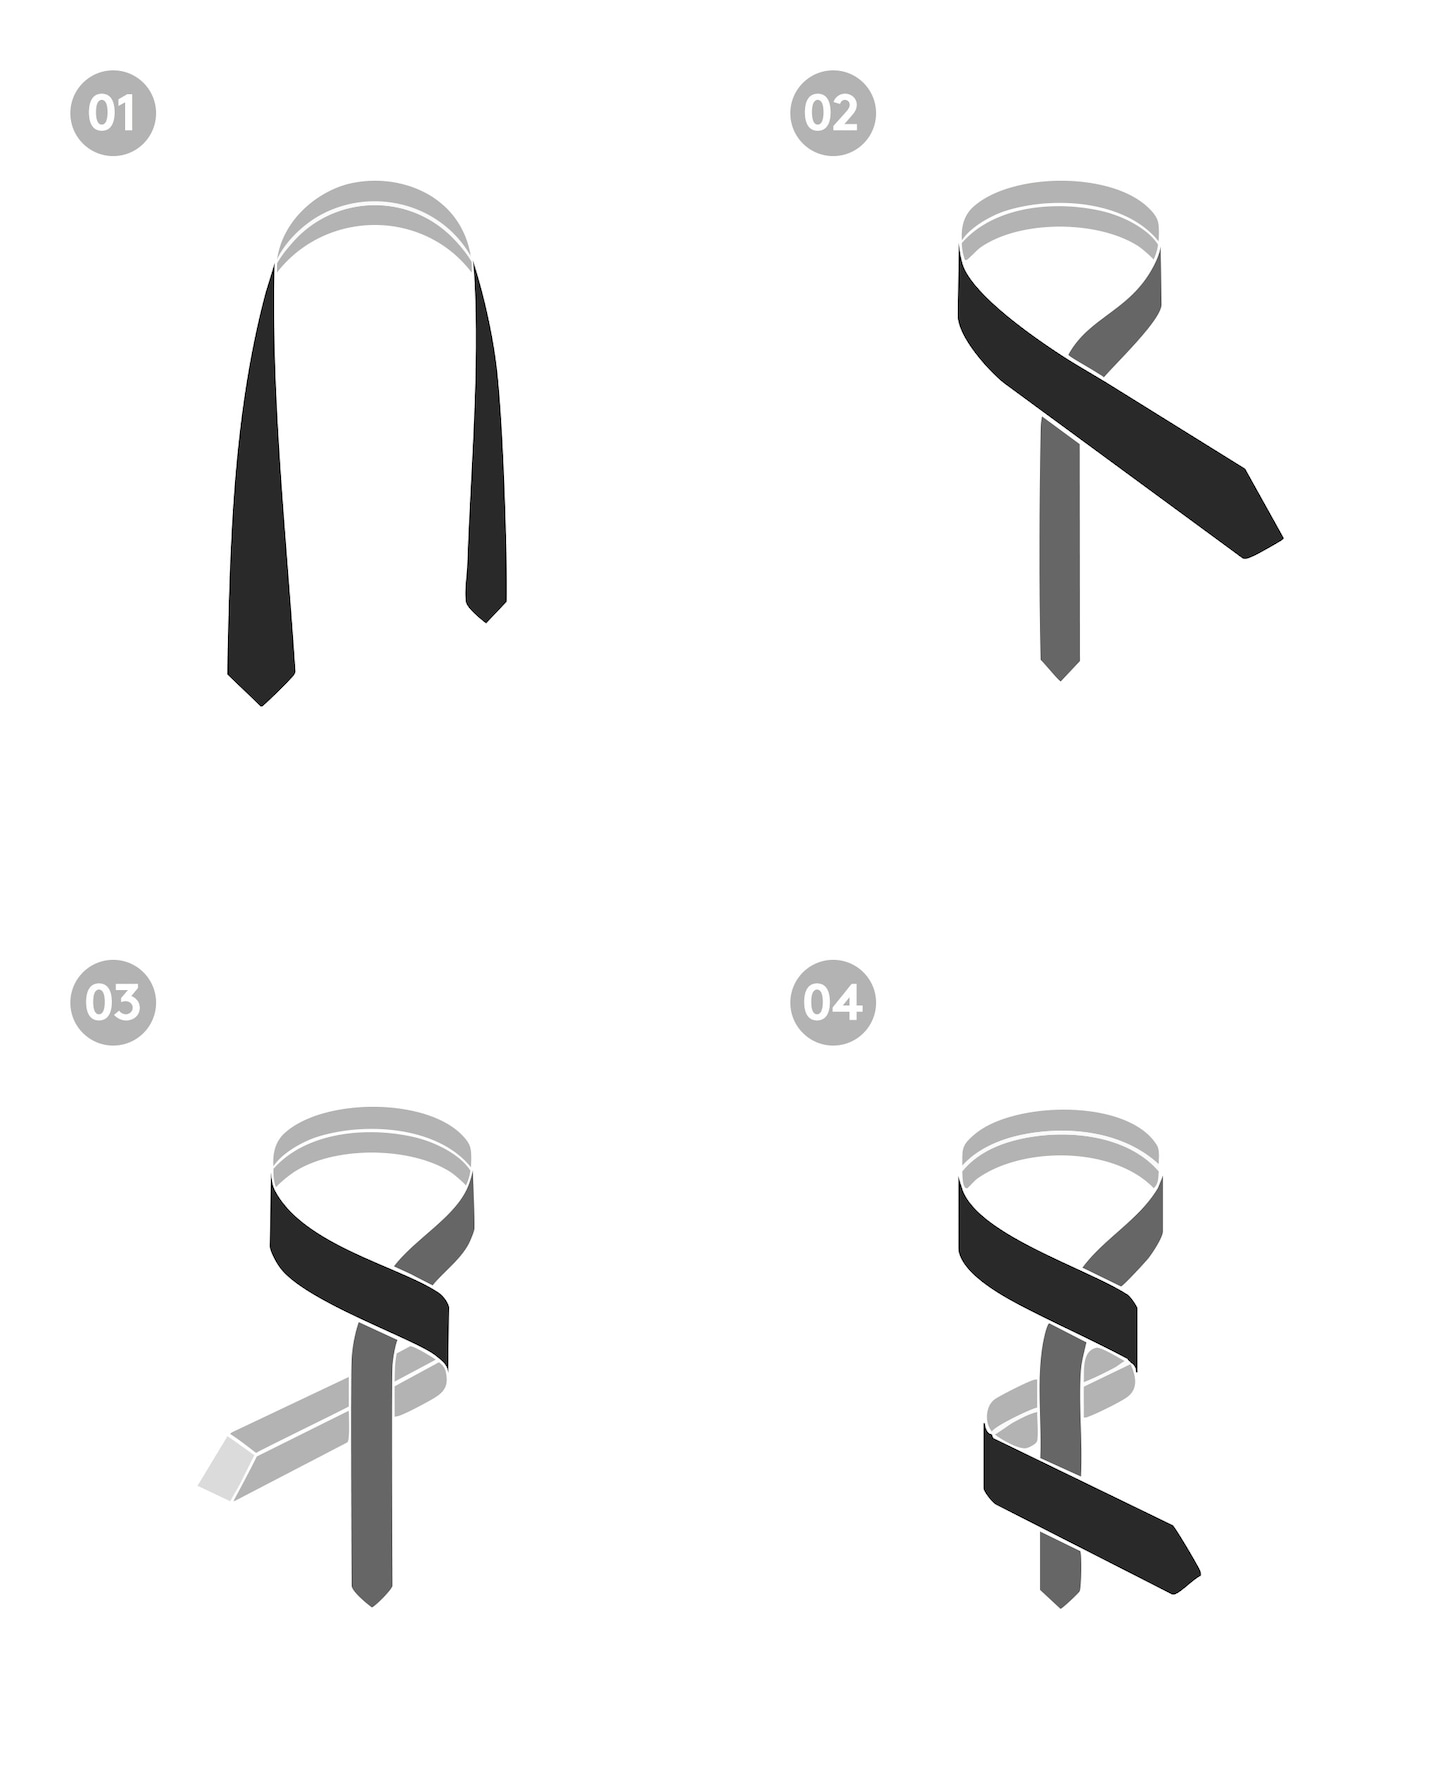
01: Start with the wide end of the tie on your right, extending about 12 inches lower than the narrow end.
02: Cross the wide end over the narrow end.
03: Bring the wide end up and behind the narrow end.
04: Bring the wide end across the front of the narrow end, from right to left.
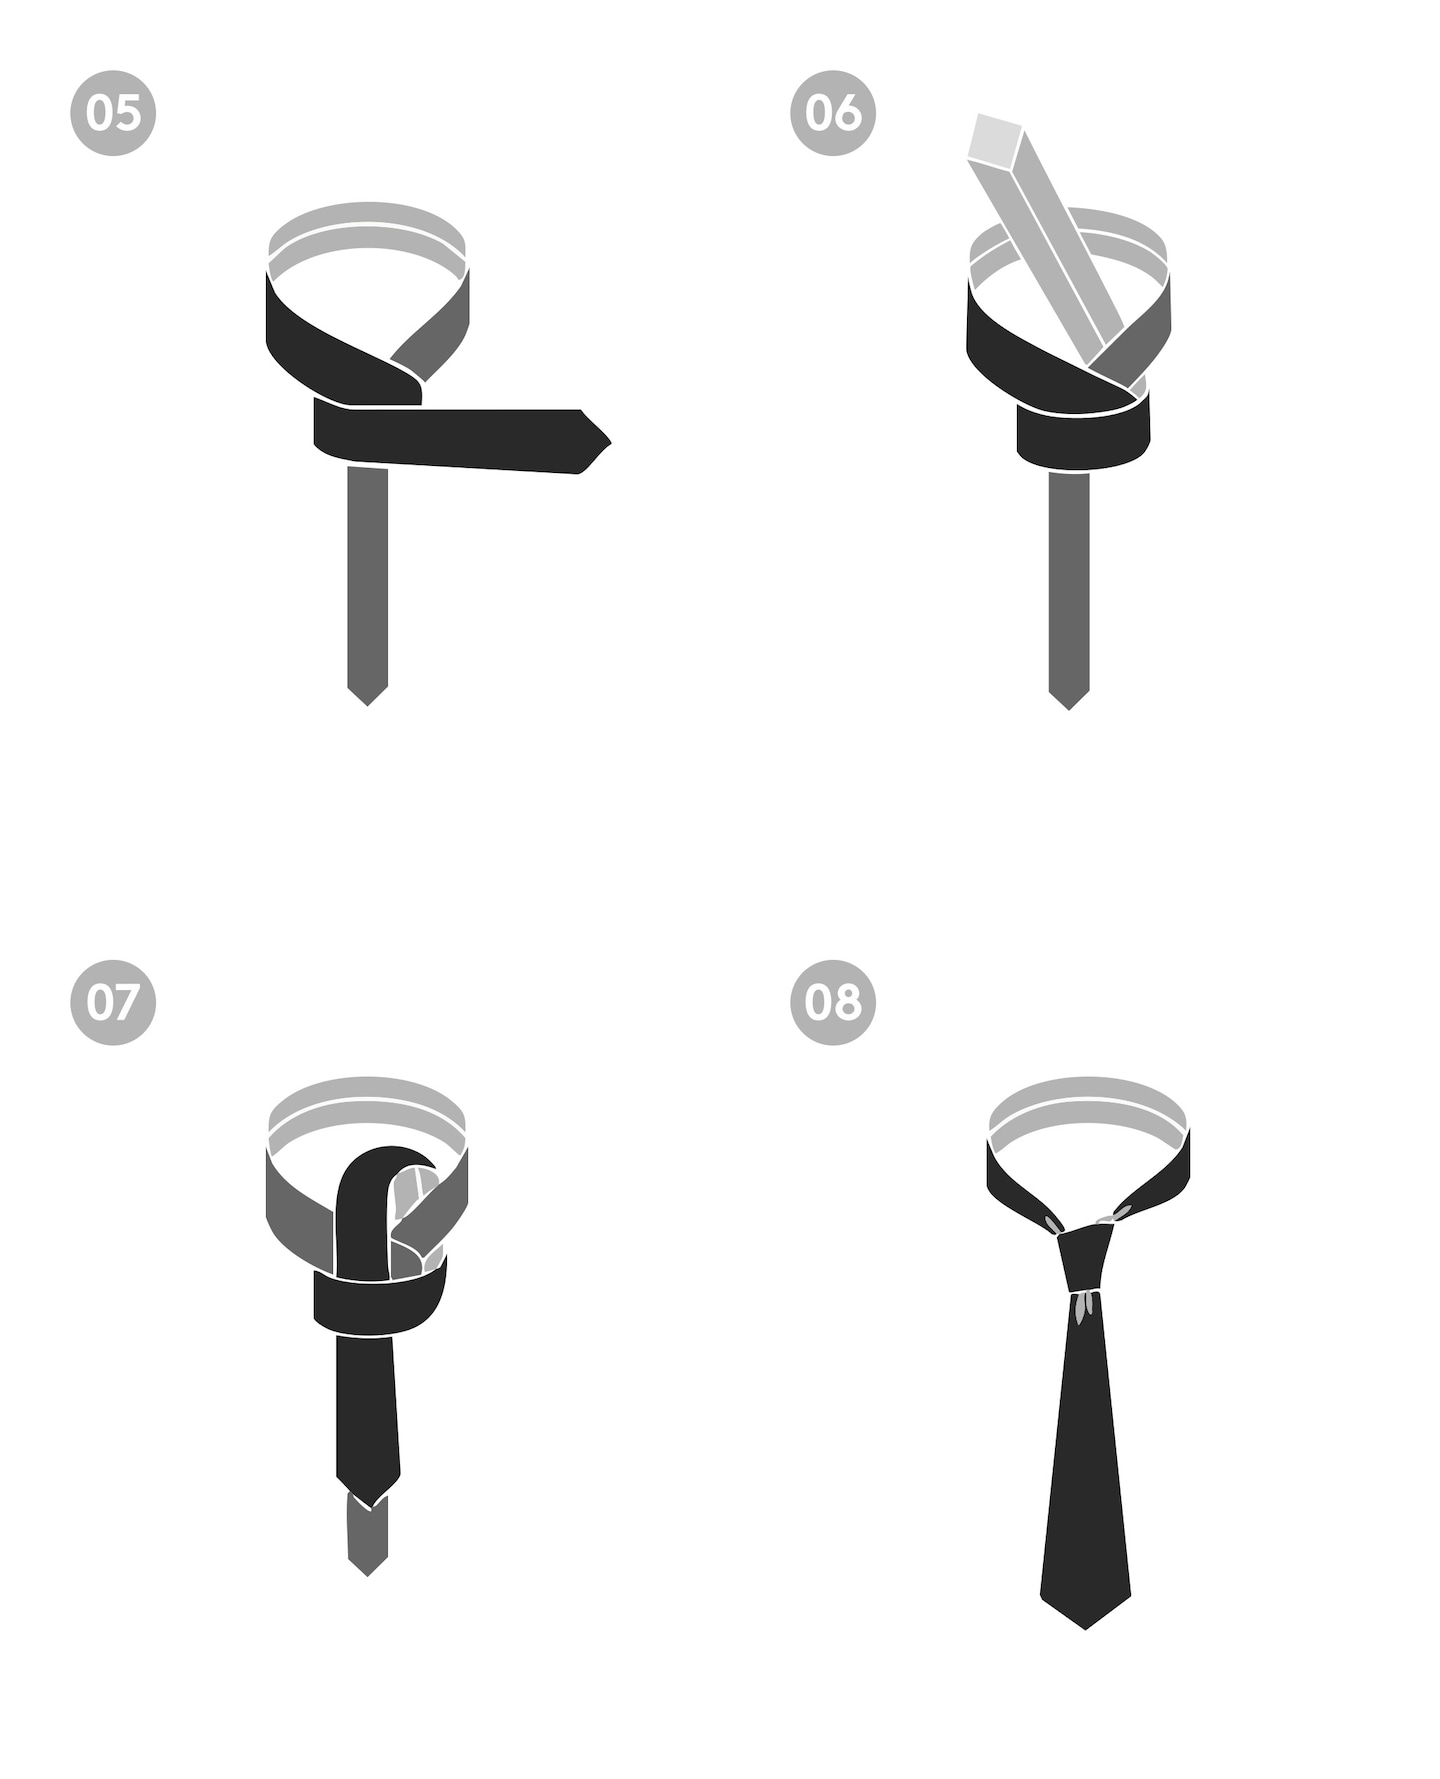
05: Move the crossed ends up towards your neck to form a tighter cross.
06: Bring the wide end up and through the loop around your neck.
07: Hold the front knot loosely and bring the wide end down through the loop you’ve just created.
08: Tighten the knot by holding the narrow end and sliding the knot up to your collar.
Where to wear it: This knot is super adaptable. It works well with most shirt collars, especially button-down and point collars. It’s a great choice for the office, a casual Friday, or even a smart-casual event. It pairs effortlessly with your everyday suits, blazers, and even some well-chosen knitwear.
THE HALF WINDSOR KNOT
Think of the Half Windsor as the Windsor’s slightly less bulky cousin. It’s symmetrical like the Windsor but a bit smaller, making it a versatile option for many occasions.
HOW TO TIE IT
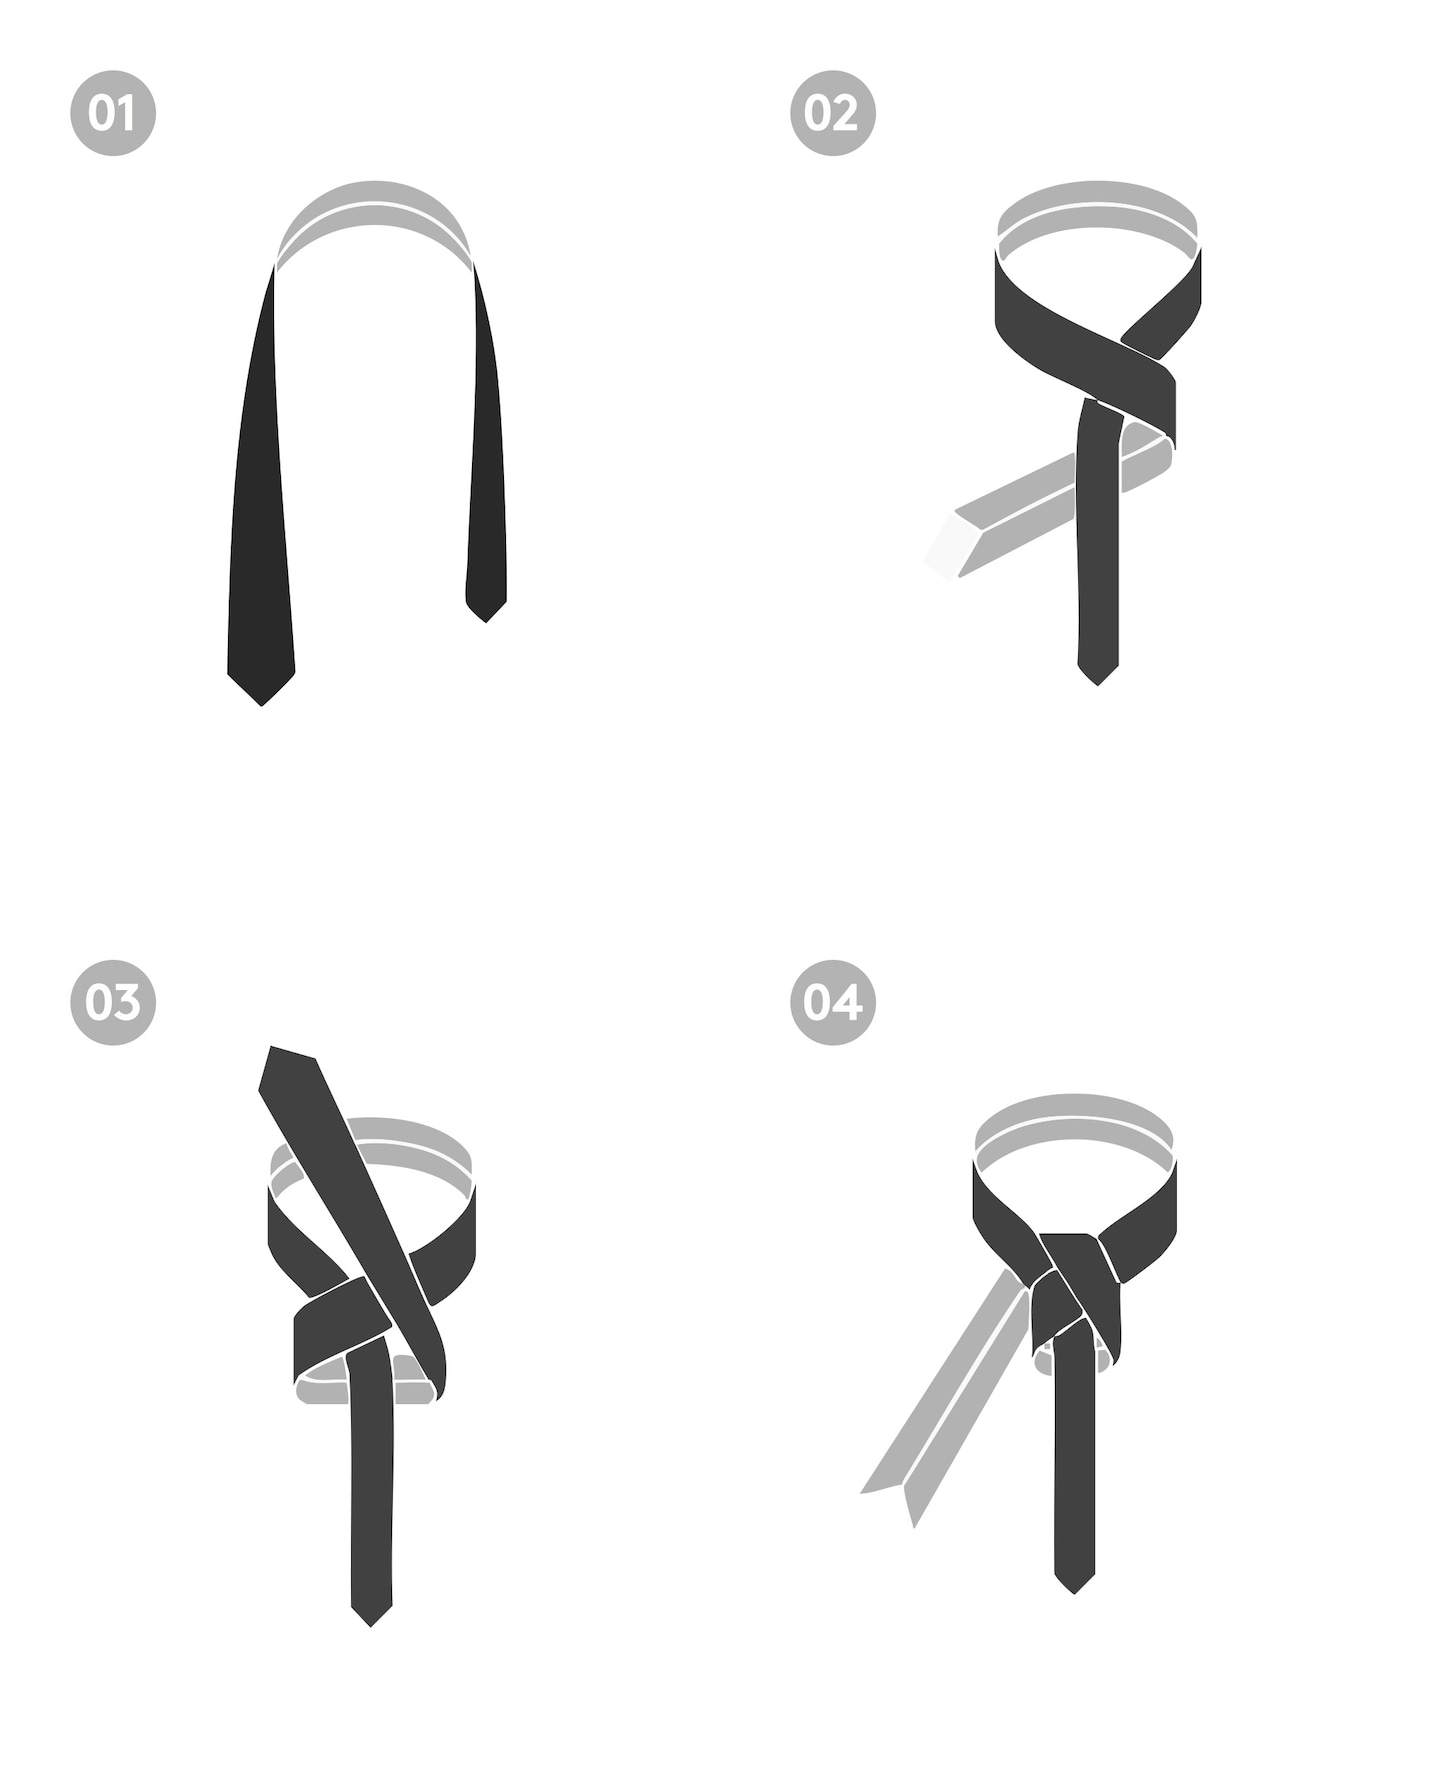
01: Start with the wide end of the tie on your right, extending about 12 inches lower than the narrow end.
02: Cross the wide end over the narrow end from underneath.
03: Bring the wide end up and behind the narrow end to the right.
04: Bring the wide end down through the back of the narrow end from right to left.
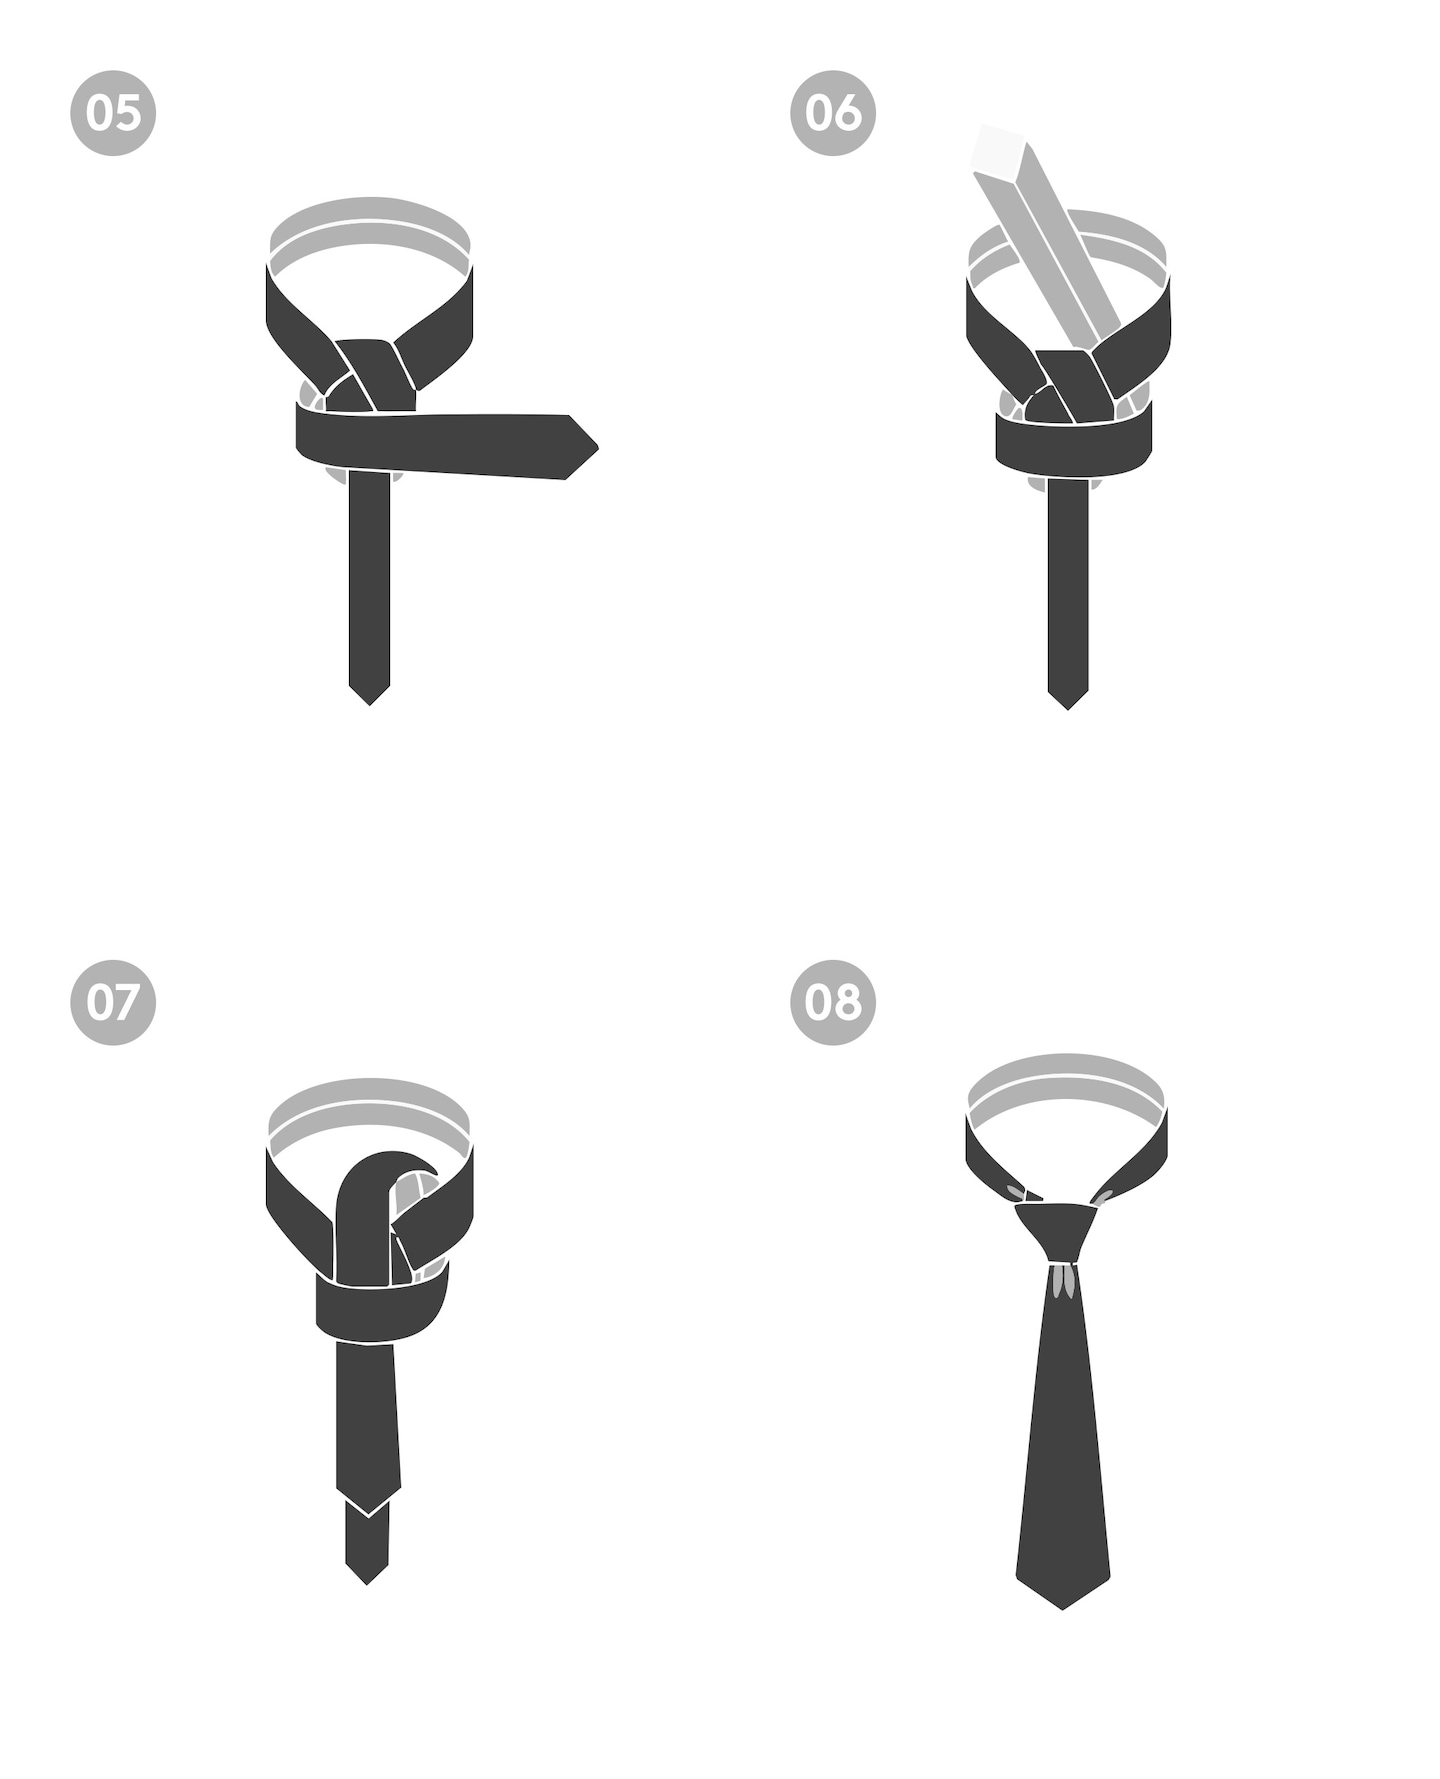
05: Bring the wide end up, through the loop around your neck, and over the front.
06: Bring the wide end back across and up through the knot towards your neck
07: Hold the front knot loosely and bring the wide end down through the loop you’ve just created.
08: Tighten the knot by holding the narrow end and sliding the knot up to your collar.
Where to wear it: The Half Windsor strikes a great balance between formality and everyday wear. It works well with most collar types, including point, spread, and button-down collars. It's a solid choice for the office, business casual settings, and smart events. It complements both your more formal suits and your stylish blazer combinations.
THE WINDSOR KNOT
Looking for something a bit more formal and symmetrical? The Windsor is your man. It creates a substantial, triangular knot that exudes confidence.
HOW TO TIE IT
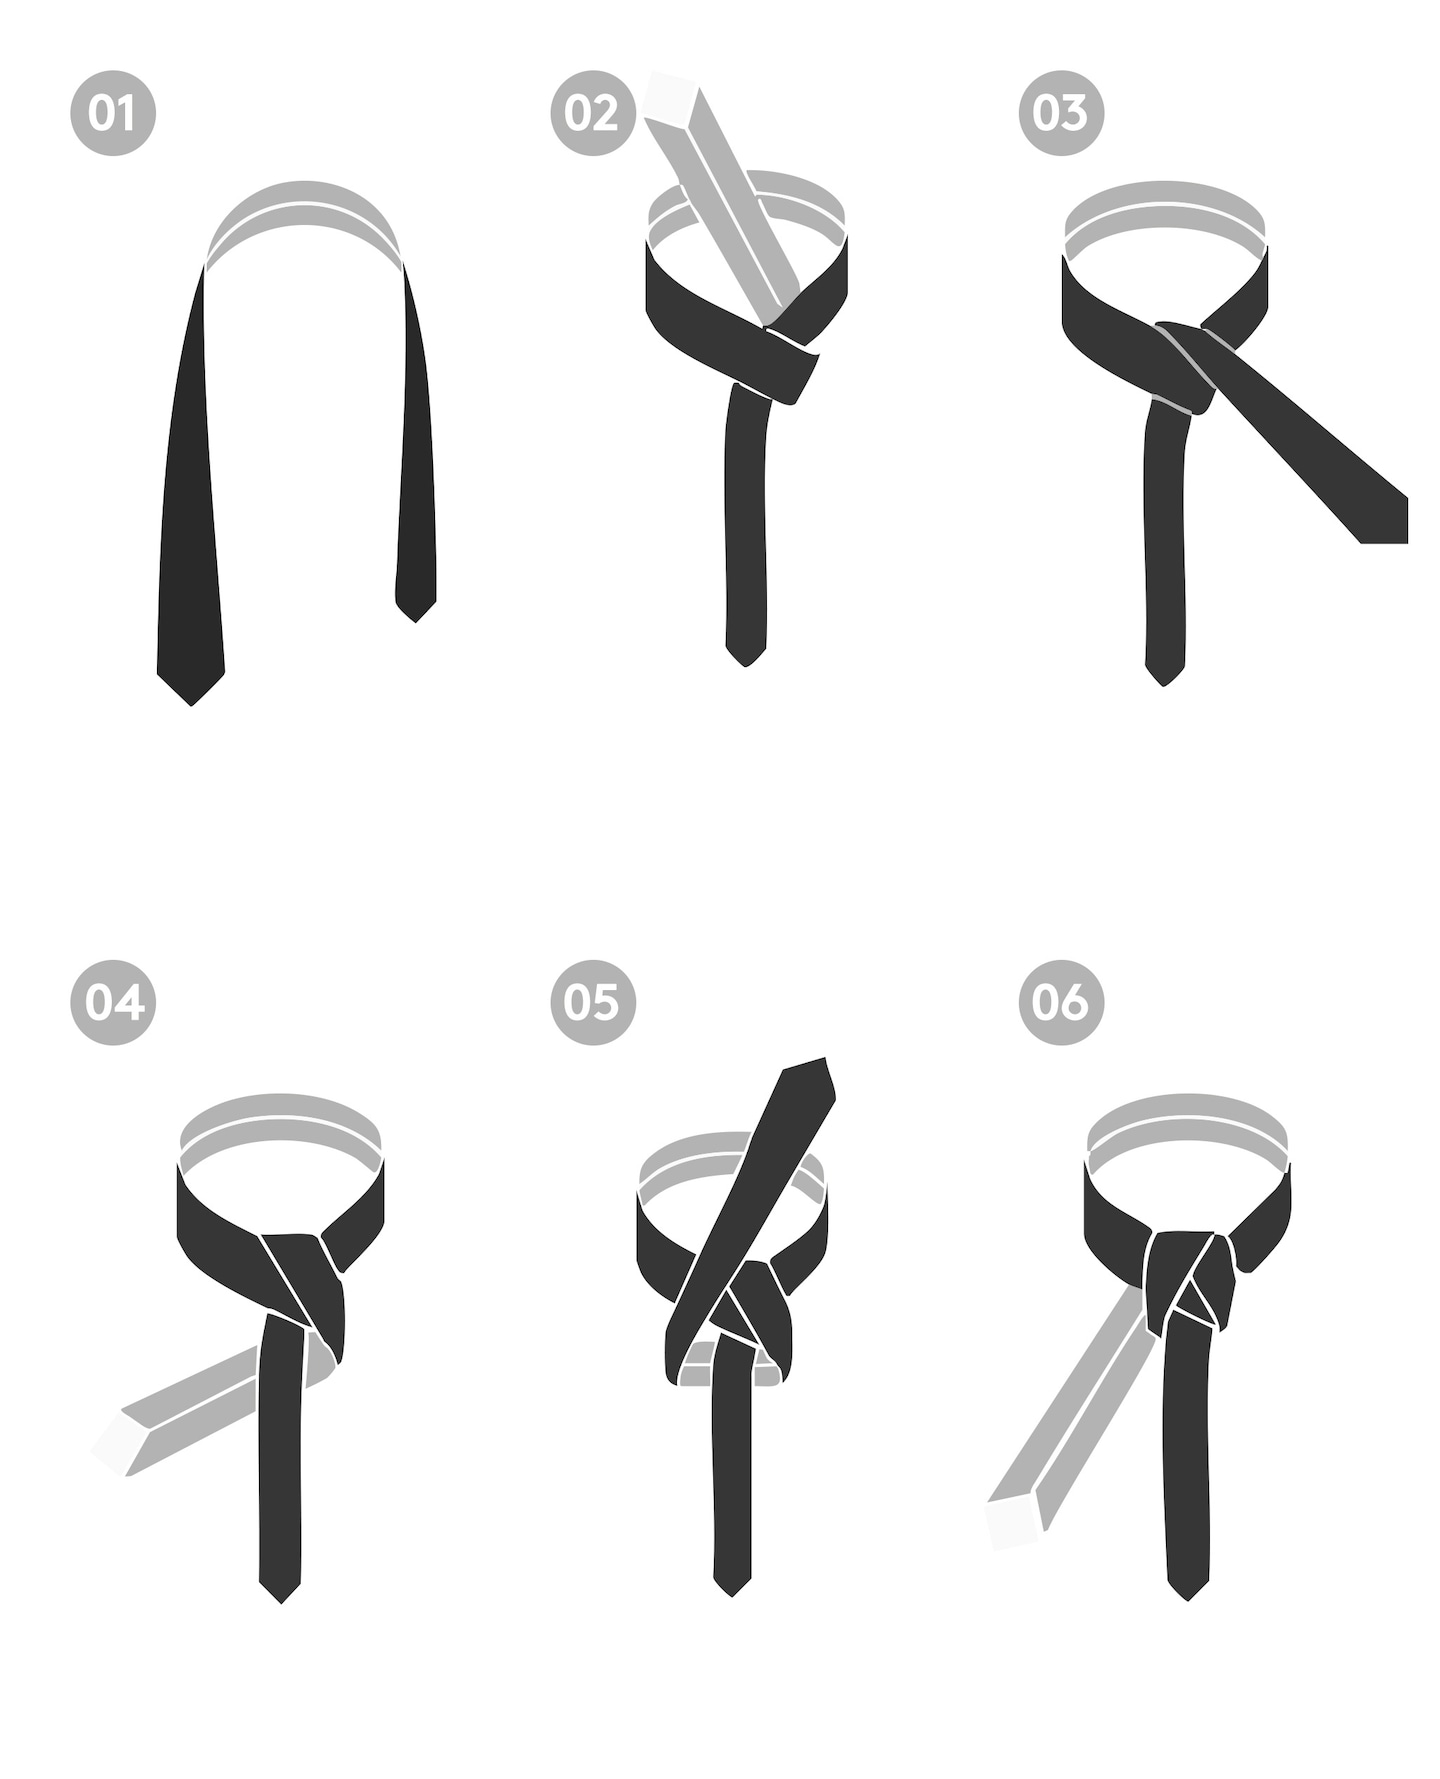
01: Start with the wide end of the tie on your right, extending about 12 inches lower than the narrow end.
02: Cross the wide end over the narrow end and up underneath the knot.
03: Cross the wide end over the narrow end and back over the knot to the left.
04: Bring the wide end up and behind the narrow end to the right.
05: Bring the wide end across the front of the narrow end from right to left.
06: Bring the wide end up and behind the narrow end to the left.
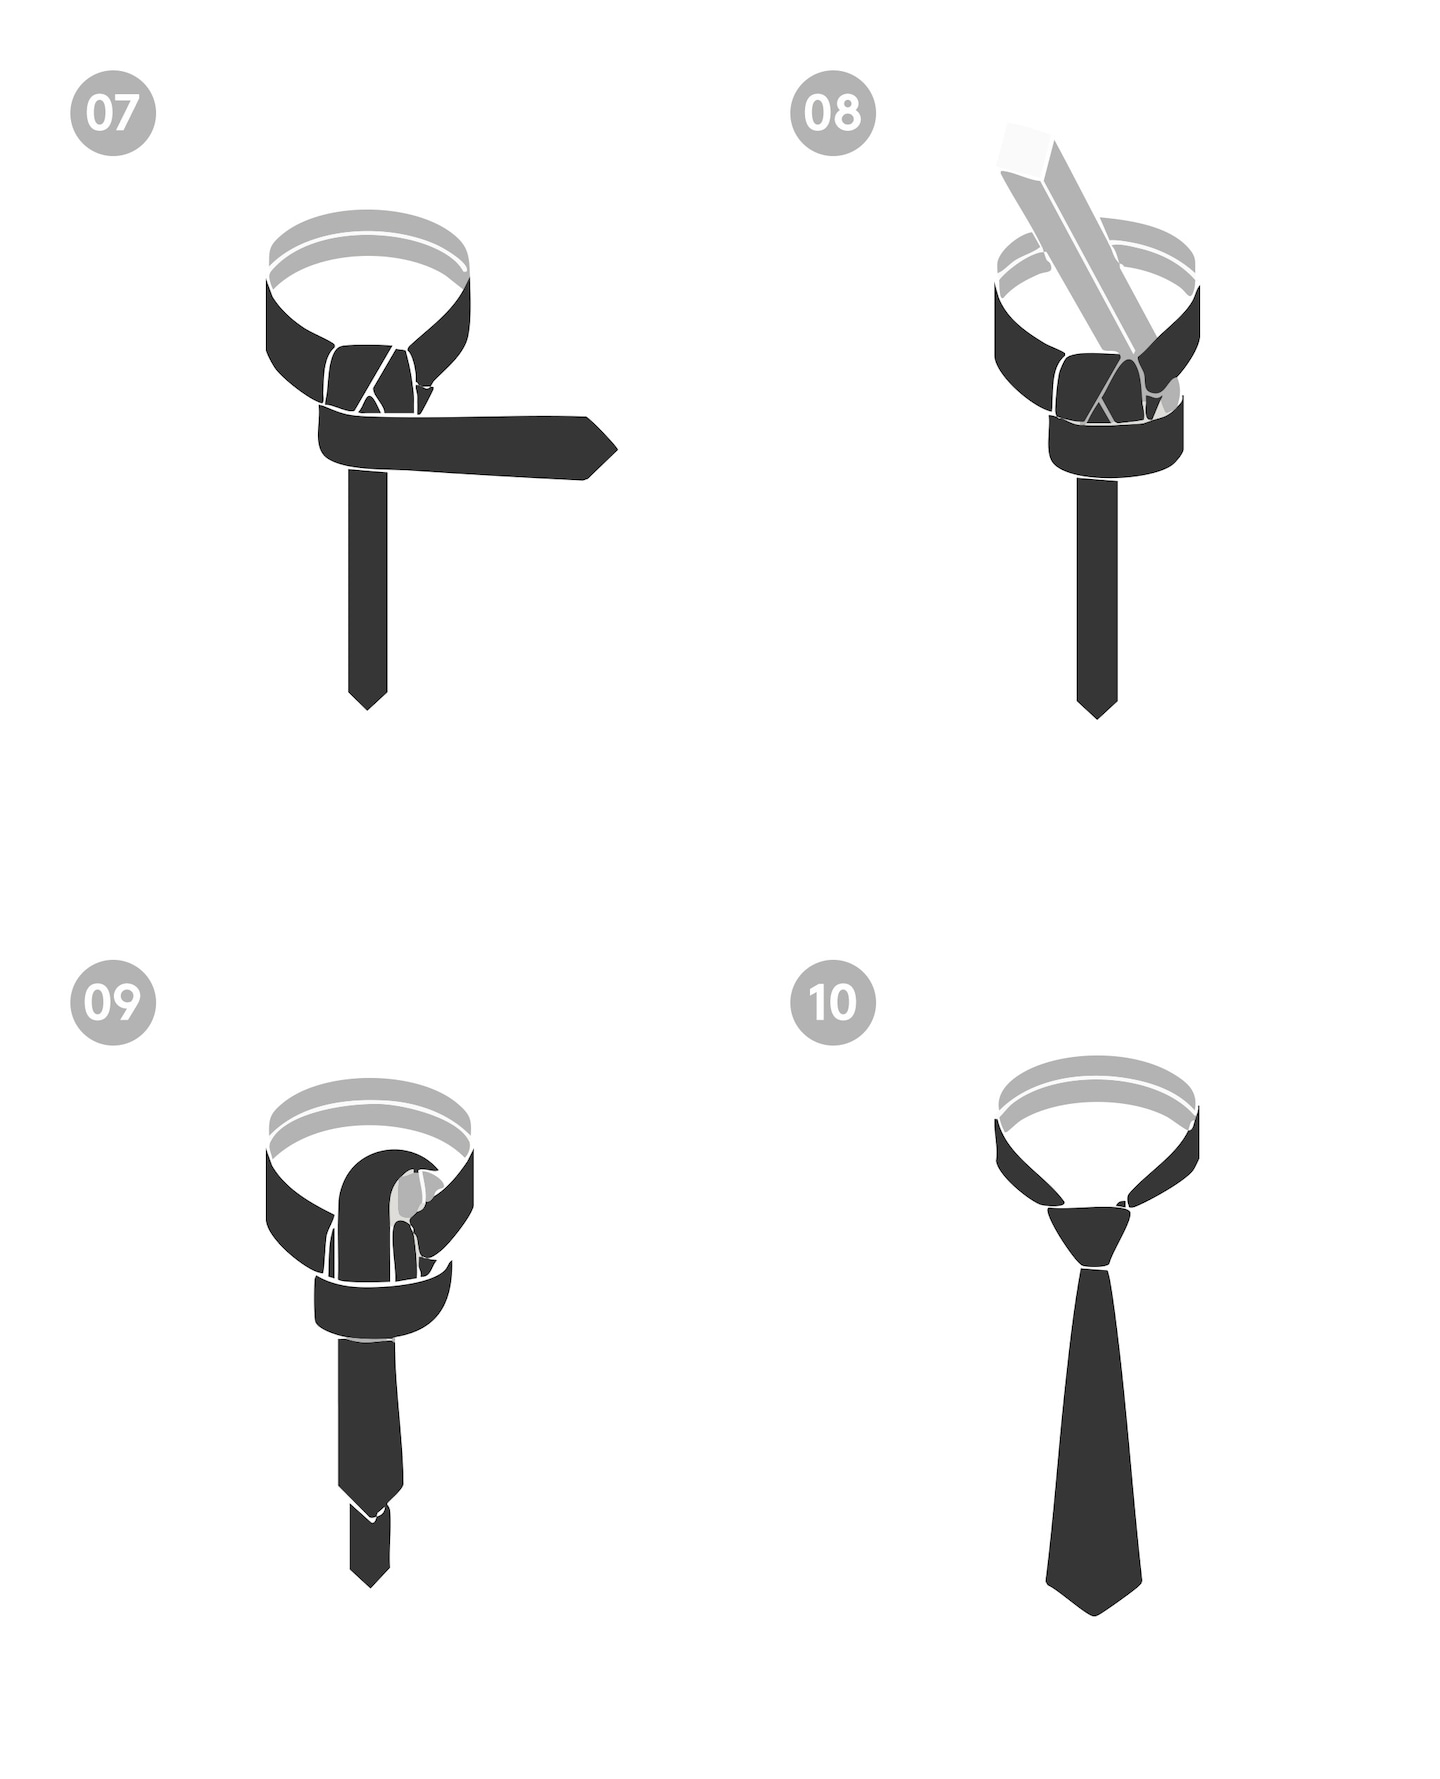
07: Bring the wide end across the front of the narrow end from left to right.
08: Bring the wide end up and through the loop around your neck.
09: Hold the front knot loosely and bring the wide end down through the loop you’ve just created.
10: Tighten the knot by holding the narrow end and sliding the knot up to your collar.
Where to wear it: The Windsor knot is best suited for formal occasions, important business meetings, and events where you want to make a strong impression. It works particularly well with wider spread or cutaway collars that can accommodate its larger size. Pair it with your best suit for a polished and powerful look.
Mastering these three knots will give you a solid foundation for any occasion. Remember, practice makes perfect, so don’t be afraid to try them out a few times until they feel natural. For inspiration on what colours you should wear with your tie go to our guide to shirt, tie and suit combinations.