
MASTERING THE ART OF TYING A BOW TIE
Looking to add a little polish and personality to your formal wear? A well-tied bow tie is the secret weapon of any sharp dresser. Unlike regular ties, a bow tie signals confidence, style, and a willingness to stand out from the crowd. Whether you're heading to a wedding, a black-tie event or a Friday night out, knowing how to tie a bow tie is a skill worth having. And the best part? Once you've nailed it, you've got it for life.
THE HISTORY BEHIND THE BOW TIE
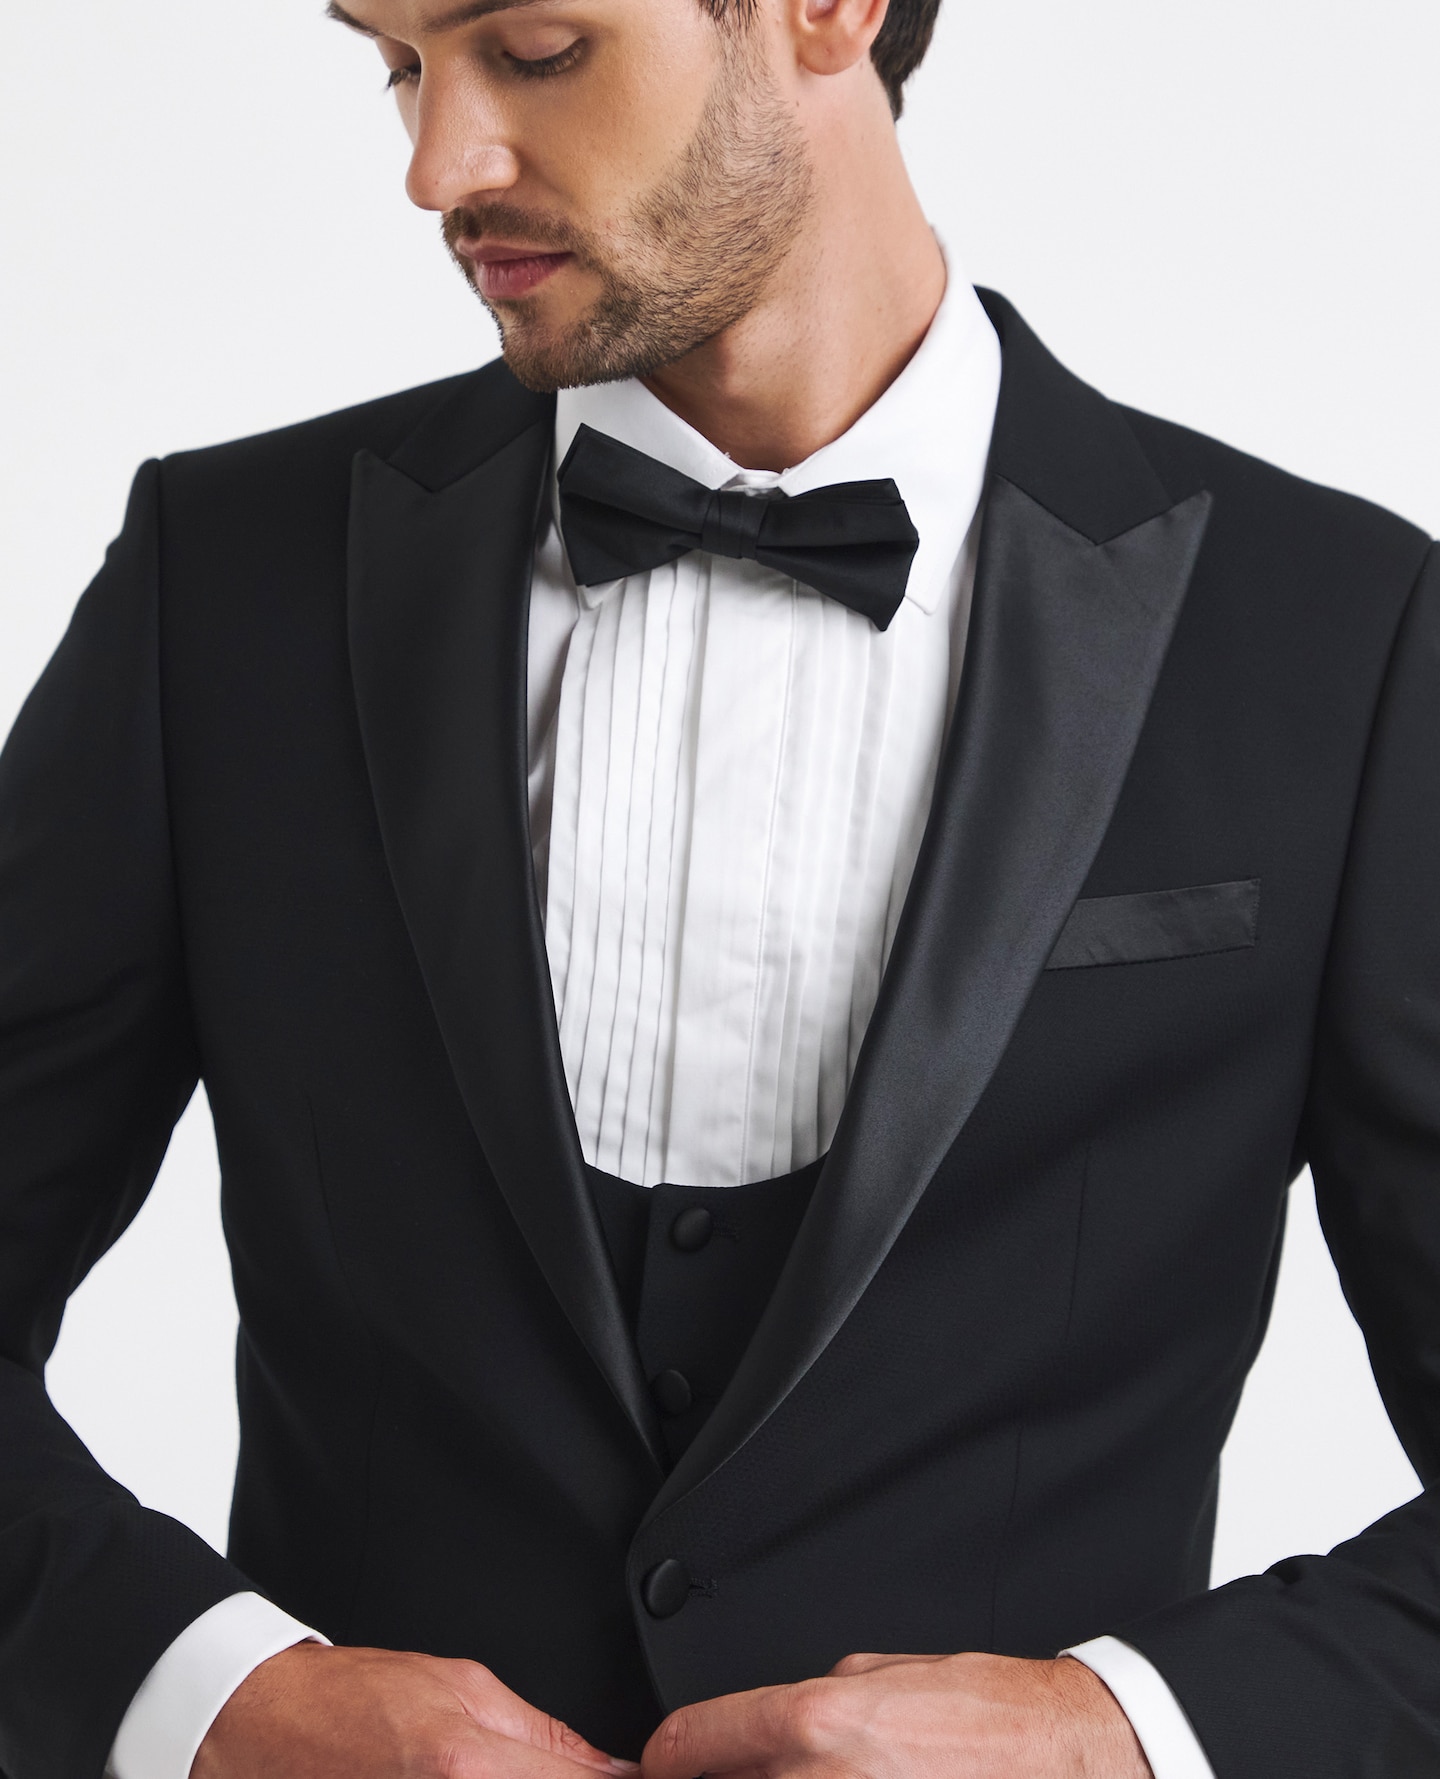
Ever wondered where the bow tie came from? Its story goes back further than you might think. It evolved from the cravat in the 17th century, but really came into its own during the 19th century when it became the go-to neckwear for formal occasions.
Back then, a bow tie was a mark of sophistication and good taste, and it still carries that reputation today. While regular ties have become the norm for everyday workwear, the bow tie has kept its charm and exclusivity. From tuxedos and black-tie events to anyone looking to do things a little differently, it’s a classic choice that never goes out of style.
Ready to give it a go? Here's how to tie a bow tie, step by step.
THE CLASSIC BOW TIE KNOT
This is the only method you need. Master this and you're sorted It creates that perfect, symmetrical bow that works for any formal occasion.
HOW TO TIE IT
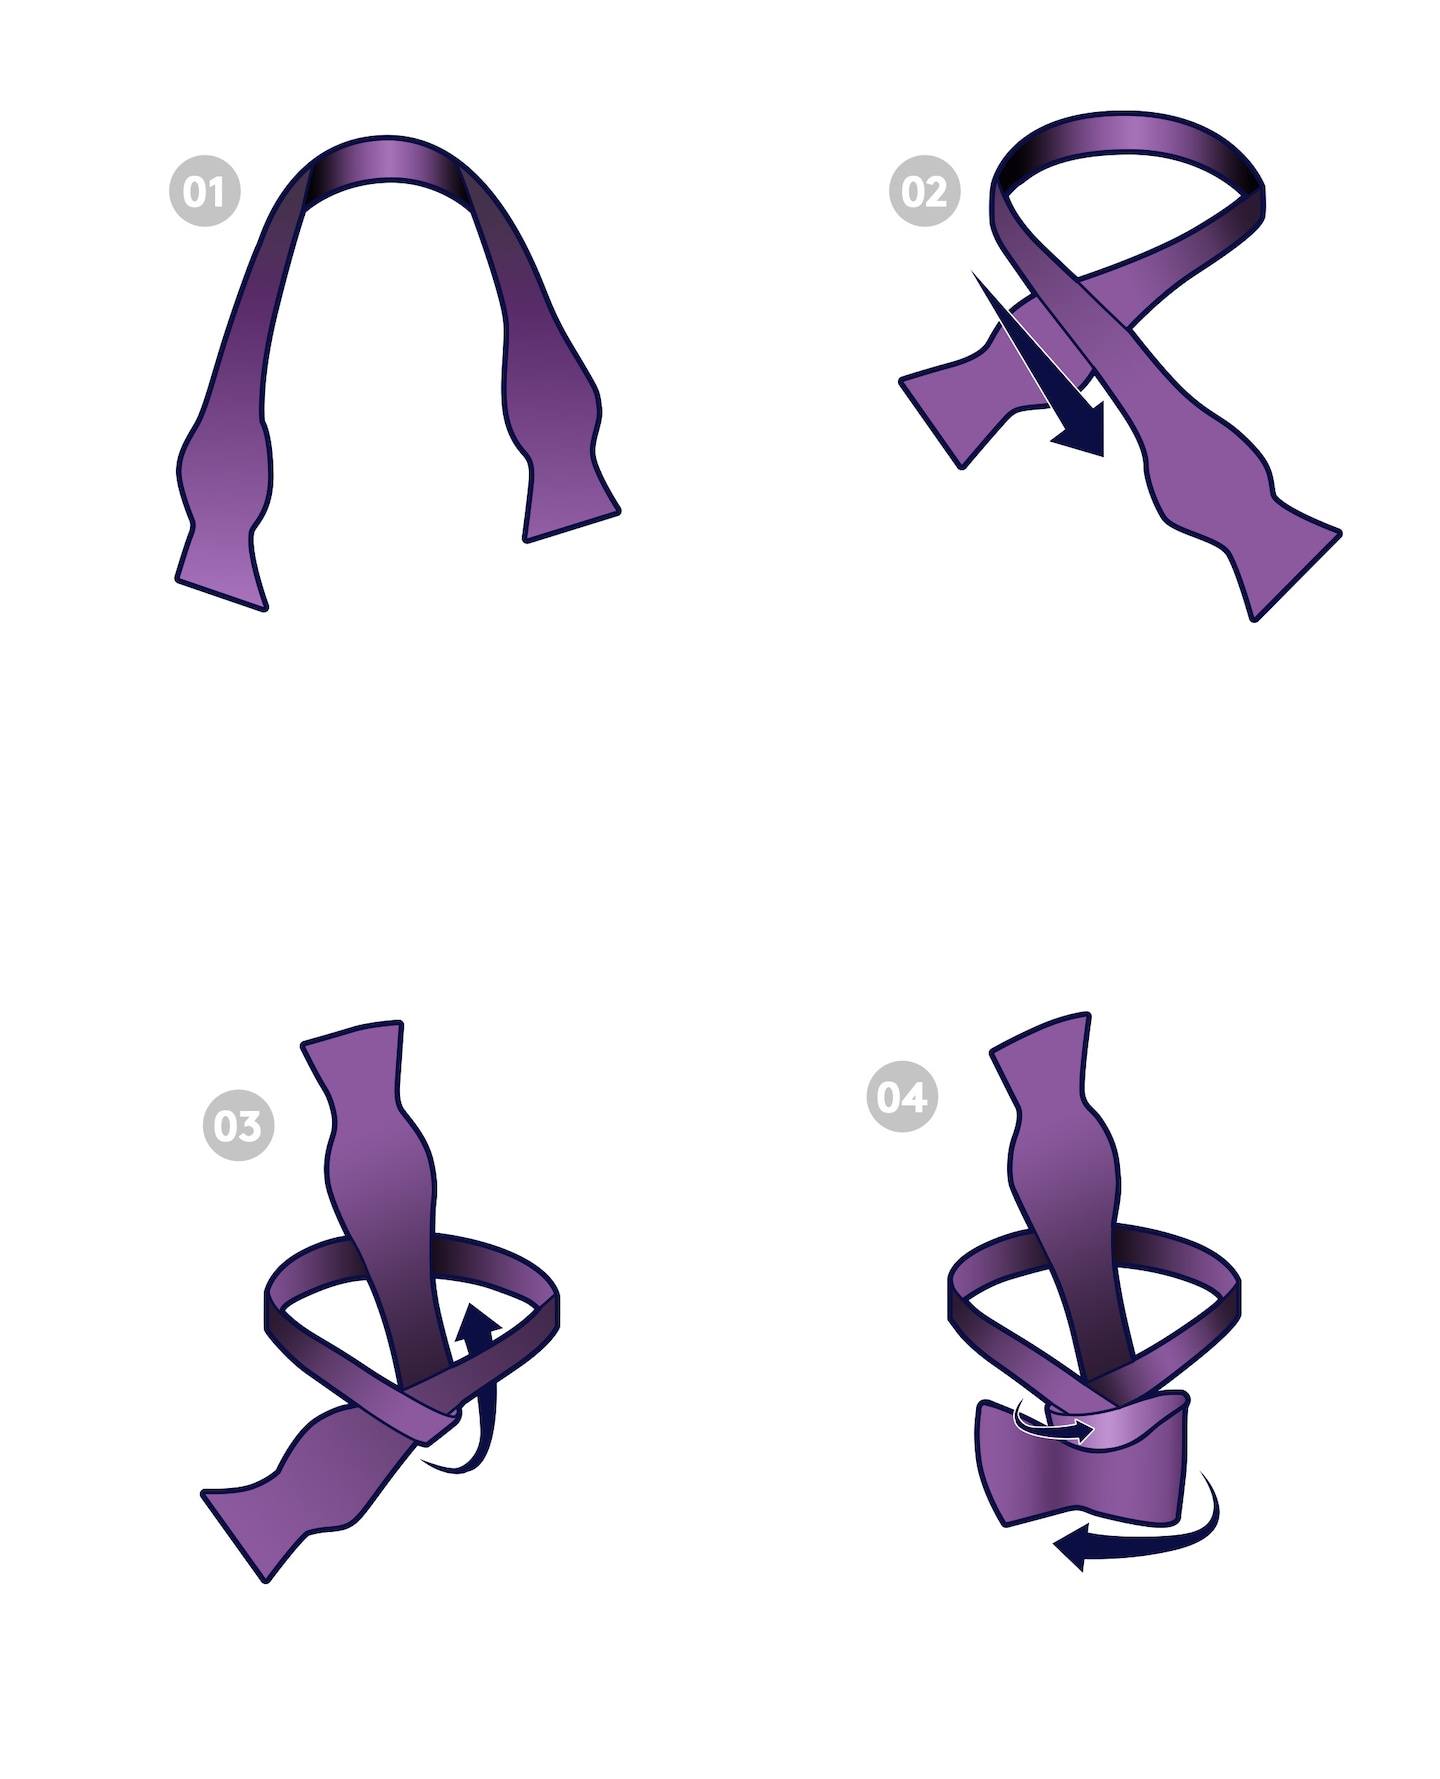
1. Get the length right from the start. Drape the bow tie around your neck with one end slightly longer than the other. The shorter end should sit just below your collarbone, while the longer end hangs a few inches lower. This sets you up for perfect proportions.
2. Cross the longer end over the shorter end to form an X. This is your foundation. Get this right and everything else follows.
3. Bring the longer end up and through the loop around your neck. Pull it snug (but not strangling) against your collar. This creates your base knot, like the first step of tying your shoes.
4. Take the shorter end and fold it horizontally to create the front of your bow. Hold it steady in the middle. This is where your knot will sit.
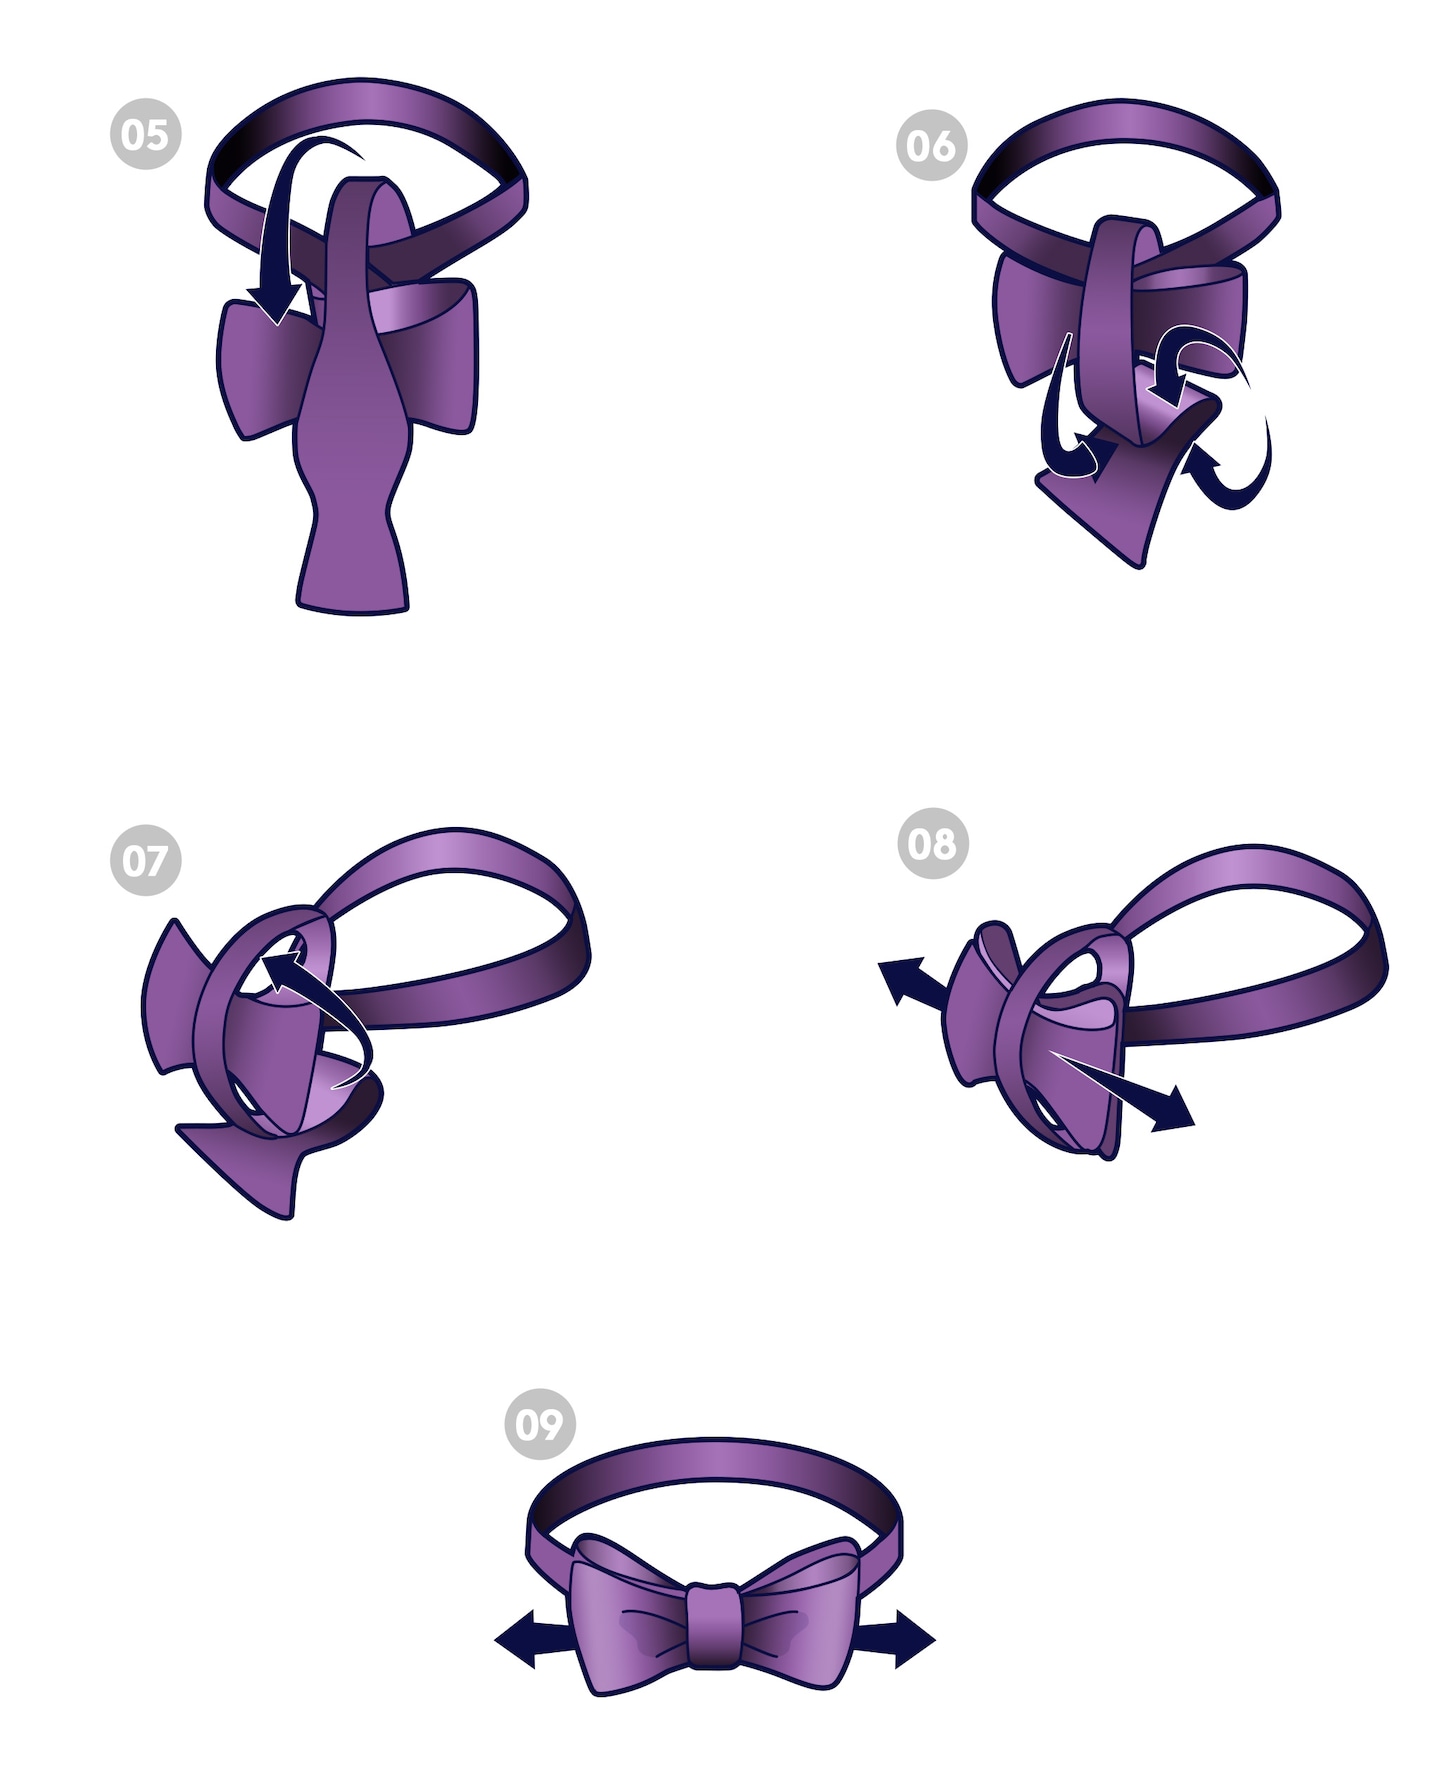
5. Drape the longer end over the front bow you've just created. At this point it'll look lopsided, and that's exactly right. The longer end is hanging loose in the middle waiting for its moment.
6. Fold the longer end backward and pinch it to form the back of the bow. Now you've got two loops: one at the front (the short end) and one at the back (the long end). This is where it starts looking like an actual bow tie.
7. Here's the bit that feels fiddly but is absolutely crucial. Take the back loop and push it through the small knot at the centre (where you've been holding the front fold). Don't panic if it feels a bit awkward. This is what locks everything into place.
8. Tighten it up by gently tugging both sides of the bow. The goal here is balance. Both loops should be roughly the same size and the whole thing should sit snug around your collar.
9. Final touches. Fluff out the loops with your fingers, adjust the ends until they're even, and make sure the bow sits flush against your collar with no sagging or twisting.
Where to wear it: The bow tie is your secret weapon for formal events. It's essential for black-tie occasions, weddings, tuxedo affairs, and anywhere you want to make a confident style statement. It also pairs beautifully with dinner jackets, formal suits, and dress shirts. The bow tie works particularly well with spread-collar or wing-collar shirts that give it room to shine.
PRE-TIED AND CLIP-ON BOW TIES
Not quite ready to master the knot? No judgment. Pre-tied and clip-on bow ties are great alternatives, especially if you only wear a bow tie occasionally or prefer convenience. When worn correctly, they look just as smart as hand-tied versions and take zero effort. They're also brilliant for keeping a consistent look throughout a long event without worrying about your knot loosening.
Pre-tied bow ties come with the knot already formed for you. You simply fasten them around your neck using a small clasp. Clip-ons work even faster. Just clip them onto your collar or inside your shirt neck. Both options are perfectly acceptable, and even experienced bow tie wearers often keep a pre-tied or clip-on one handy for occasions when convenience is key.
HOW TO ADJUST YOUR BOW TIE
Once you've tied it, you might need to fine-tune. Here's how to get it looking perfect:
Getting the loops even: The most common issue. If one loop is bigger than the other, gently pull the smaller loop outward while holding the knot steady. Usually just a millimetre or two makes the difference.
Positioning at your collar: Your bow tie should sit snug against your neck, right at the base of your collar, with the knot sitting dead centre under your chin. If it's sitting too low or too high, untie and start again. It's quicker than trying to adjust a poorly positioned knot throughout the night.
The width of your loops: Personal preference here. Some men like generous, dramatic loops. Others prefer a neater, more compact look. As you practice, you'll find your sweet spot. Just make sure both loops are the same width for balance.
Throughout the evening: Bow ties are generally pretty stable once tied correctly, but if it does shift, a gentle tug on both loops usually sorts it without needing to retie completely.
Tying it too loose: This is the biggest culprit. A loose bow tie will slip, rotate, and look sloppy all evening. Make sure you're pulling the knot snug against your neck as you tighten in step 07. It should feel secure but not uncomfortably tight.
Uneven loops: We see this all the time. One loop ends up bigger than the other, throwing off the whole look. Take your time in step 05-06 when forming both loops. They don't need to be perfectly symmetrical, but close matters.
Tying it too high or too low: Your bow tie should sit where your collar naturally opens, right at the base of your neck. Too high looks pinched. Too low looks like you're not quite in control. Aim for the sweet spot in the middle.
Starting with unequal lengths: Beginning with one end significantly longer than the other throws off the whole balance. Aim for roughly 1-2 inches difference at the start. If it's more than that, reposition before you begin tying.
Forgetting to tighten: You've got the knot formed but it's still loose and floppy. Don't move on until you've pulled it snug in step 07. This is what separates the amateurs from the pros.
Over-adjusting: Sometimes less is more. If you've tied it and it looks decent, resist the urge to keep tweaking it. A few micro-adjustments are fine, but endless fiddling often makes it worse.
Knowing how to tie a bow tie is a useful skill that adds a touch of confidence and style to any formal look. With a little practice, the process will soon feel natural. Take some time to get the hang of it before your next big event, and you'll be tying them without thinking about it.
For inspiration on styling your bow tie with the perfect suit and dress shirt, check out our guide to formal wear combinations.